
Simple guide to forks in GitHub and Git
In my experience, one of the most confusing parts about getting started in Git and GitHub is trying to figure out the following: What do I do in Git, and what do I do in GitHub?
Git tutorials tend not to address this question, since they are (purposefully) focused on teaching you Git commands and concepts, and do not presume you will use GitHub. GitHub help articles bridge this gap somewhat, but each article is narrowly focused and ultimately doesn't provide a conceptual overview of the "Git vs GitHub" question.
If you are the type of learner that benefits from understanding concepts before diving into code, and you are new to Git and GitHub, I suggest that the first step is to understand forking. Why?
- Forking is a common way to get started in GitHub.
- Forking requires very few Git commands, but the ones it does use are very important.
- Forking provides a foundational understanding of Git and GitHub that will benefit you later.
This guide uses two simple diagrams to teach you the two main workflows for forks. I'm not going to cover any code, but in the Conclusion I'll link to the code you should use.
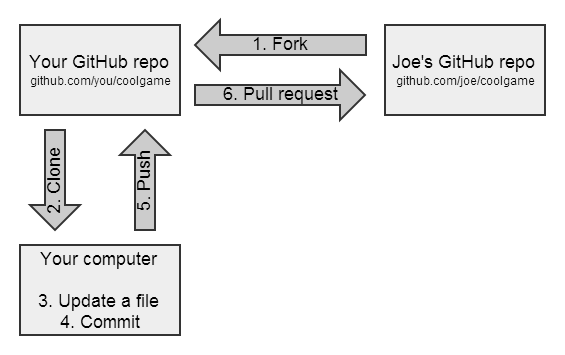
Forking and updating a repo
Let's say there's a programmer named Joe who built a game you would like to improve, and he is hosting his code in a GitHub repository. Here's what you do:
-
Fork his repo: This is a GitHub operation, in which you are making a copy of Joe's repository (including the files, commit history, issues, and more). This repository now lives in your GitHub account. Nothing has yet happened to your local computer.
-
Clone your repo: This is a Git operation, in which you are using Git to tell GitHub "please send me a copy of my repo." The repo is now stored on your local computer.
-
Update some files: You can now make updates to the files in whatever program or environment you like.
-
Commit your changes: This is a Git operation, in which you are telling Git to record the file changes you have made. This is an operation on your local computer only.
-
Push your changes to your GitHub repo: This is a Git operation, in which you are using Git to tell GitHub "here are my changes." Pushing does not happen automatically, so until you do this step, GitHub does not know about your commits.
-
Send a pull request to Joe: If you think that Joe might like to incorporate your changes, you send him a pull request. This is a GitHub operation, in which you are communicating your changes to Joe, and "requesting" that he "pull" from your repo. It is up to him whether he pulls from you or not.
If Joe accepts your pull request, he will pull your changes into his repo. Victory!
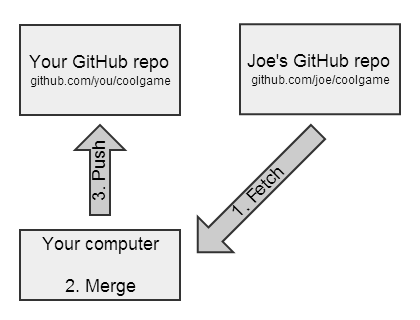
Syncing a fork
Let's say that Joe and other contributors have made some more updates to the game, and you've thought of some more updates you'd like to make. Before you do anything else, it's best to "sync your fork" so that you are working on the latest copy of the files. Here's what you do:
-
Fetch changes from Joe's repo: This is a Git operation, in which you are using Git to tell GitHub that you would like to retrieve the latest files from Joe's repo.
-
Merge those changes into your repo: This is a Git operation, in which you are updating the repo on your local computer with those changes (which have been temporarily stored in a "branch"). Note: Steps 1 and 2 are often combined into a single Git operation called a "pull."
-
Push the updates to your GitHub repo (optional): Remember that your local computer does not automatically update your GitHub repo. Therefore, the only way to get your GitHub repo up-to-date is by pushing up the latest changes. You can either do this right away, or you can wait until you have made some updates of your own and committed them locally.
Take note of the contrast between the workflow for forking and the workflow for syncing: When you initially fork a repo, the flow of information is from Joe's repo to your repo, and then down to your local computer. But after that initial process, the flow of information is from Joe's repo to your local computer, and then up to your repo.
Conclusion
I hope this was a helpful overview of forking in GitHub and Git. Now that you understand the concepts, you should be much better prepared to actually execute the code! My step-by-step guide to contributing on GitHub will walk you through the code in detail.
If you are new to Git and this style of learning appeals to you, I highly recommend the first two chapters of the book Pro Git, which is available online for free.
If you enjoy learning via videos, I created a 11-part video series (36 minutes total) introducing Git and GitHub to beginners.