
Step-by-step guide to contributing on GitHub
Have you thought about contributing to an open source project, but you're too confused (or intimidated) by the process to even try? I've been there too!
I wrote this step-by-step guide to show the exact process I use when contributing to a project on GitHub. If you follow this guide exactly, you can make your first open source contribution TODAY!
Why contribute to open source?
There are many great reasons to contribute to open source projects:
- It builds your resume by demonstrating that you can collaborate with others on code.
- It gives you practice with Git and GitHub, which is a valuable data science skill.
- It helps you to build relationships in the open source community.
- It feels good to give back to a project that you use!
In the example below, I'm going to contribute to Python's scikit-learn library. I've been teaching Machine Learning with scikit-learn for many years, so I'm more than happy to give back!
Getting started
First, you need to choose a project to contribute to. I suggest you start with a library you currently use, because you will already understand the purpose of the library and you will be invested in making it better.
Second, you need to choose how to contribute. I suggest contributing to the project documentation, since it doesn't require writing any code. Start by finding a typo or a broken link to fix. Since this should be a simple fix, you will be able to focus on learning the contribution workflow.
Once you've chosen what to fix, you can begin the step-by-step process below:
- Steps 1 through 6 are setup steps, meaning you only have to do them once for each GitHub project.
- Steps 7 through 19 should be repeated for each contribution to that project.
These resources might be helpful to you as you work through the steps:
- If you're new to Git, watch my 36-minute video series to learn the basic Git commands and terminology.
- If you just need a quick refresher on Git, scan through my Git quick reference guide.
Step 1: Sign into GitHub
Sign into your GitHub account, or create a free GitHub account if you don't have one.
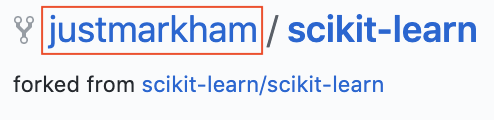
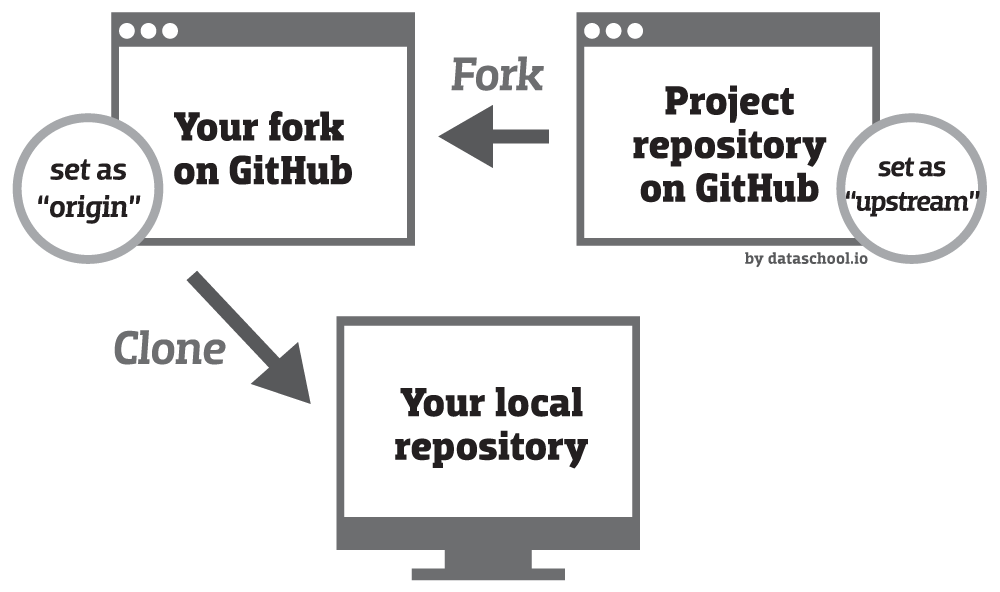
Step 2: Fork the project repository
Find the project's repository on GitHub, and then "fork" it by clicking the Fork button in the upper right corner:

This creates a copy of the project repository in your GitHub account. In the upper left corner, you will see that you are now looking at a repository in your account:
Step 3: Clone your fork
While still in your repository, click the green Clone or download button and then copy the HTTPS URL:
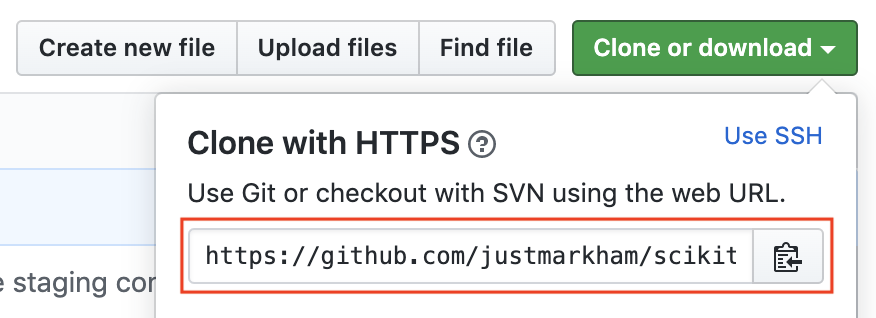
Using Git on your local machine, clone your fork using the URL you just copied: git clone URL_OF_FORK.
For example, I used git clone https://github.com/justmarkham/scikit-learn.git.
Cloning copies the repository files (and commit history) from GitHub to your local machine. The repository will be downloaded into a subdirectory of your working directory, and the subdirectory will have the same name as the repository.
(If you run into problems during this step, read the Set up Git page from GitHub's documentation.)
Step 4: Navigate to your local repository
Since the clone was downloaded into a subdirectory of your working directory, you can navigate to it using: cd NAME_OF_REPOSITORY.
For example, I used cd scikit-learn.
Step 5: Check that your fork is the "origin" remote
You are going to be synchronizing your local repository with both the project repository (on GitHub) and your fork (also on GitHub). The URLs that point to these repositories are called "remotes". More specifically, the project repository is called the "upstream" remote, and your fork is called the "origin" remote.
When you cloned your fork, that should have automatically set your fork as the "origin" remote. Use git remote -v to show your current remotes. You should see the URL of your fork (which you copied in step 3) next to the word "origin".
If you don't see an "origin" remote, you can add it using: git remote add origin URL_OF_FORK.
(If you run into problems during this step, read the Managing remote repositories page from GitHub's documentation.)
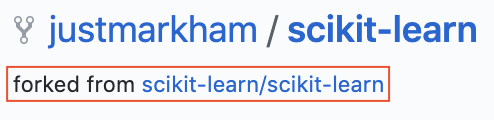
Step 6: Add the project repository as the "upstream" remote
Go to your fork on GitHub, and click the "forked from" link to return to the project repository:
While in the project repository, click the green Clone or download button and then copy the HTTPS URL:
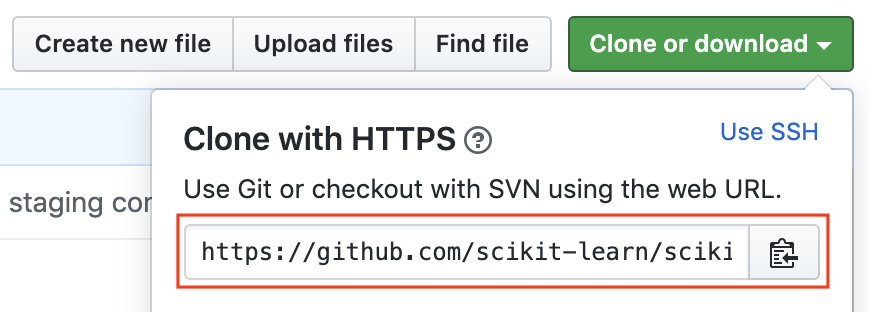
Add the project repository as the "upstream" remote using: git remote add upstream URL_OF_PROJECT.
For example, I used git remote add upstream https://github.com/scikit-learn/scikit-learn.git.
Use git remote -v to check that you now have two remotes: an origin that points to your fork, and an upstream that points to the project repository.
This diagram summarizes the entire setup process (steps 1 through 6):
Step 7: Pull the latest changes from upstream into your local repository
Before you start making any changes to your local files, it's a good practice to first synchronize your local repository with the project repository. Use git pull upstream master to "pull" any changes from the "master" branch of the "upstream" into your local repository. (If the project repository uses "main" instead of "master" for its default branch, then you would use git pull upstream main instead.)
If you forked and cloned the project repository just a few minutes ago, it's very unlikely there will be any changes, in which case Git will report that your local repository is "already up to date". But if there are any changes, they will automatically be merged into your local repository.
Step 8: Create a new branch
Rather than making changes to the project's "master" branch, it's a good practice to instead create your own branch. This creates an environment for your work that is isolated from the master branch.
Use git checkout -b BRANCH_NAME to create a new branch and then immediately switch to it. The name of the branch should briefly describe what you are working on, and should not contain any spaces.
For example, I used git checkout -b doc-fixes because I was making some small fixes to the documentation.
Use git branch to show your local branches. You should see your new branch as well as "master", and your new branch should have an asterisk next to it to indicate that it's "checked out" (meaning that you're working in it).
Step 9: Make changes in your local repository
Use a text editor or IDE to make the changes you planned to the files in your local repository. Because you checked out a branch in the previous step, any edits you make will only affect that branch.
Step 10: Commit your changes
After you make a set of changes, use git add -A to stage your changes and git commit -m "DESCRIPTION OF CHANGES" to commit them.
For example, I used git commit -m "fix typos in set_config docstring" for one of my commits.
If you are making multiple sets of changes, it's a good practice to make a commit after each set.
Step 11: Push your changes to your fork
When you are done making all of your changes, upload these changes to your fork using git push origin BRANCH_NAME. This "pushes" your changes to the "BRANCH_NAME" branch of the "origin" (which is your fork on GitHub).
For example, I used git push origin doc-fixes.
Step 12: Begin the pull request
Return to your fork on GitHub, and refresh the page. You may see a highlighted area that displays your recently pushed branch:

Click the green Compare & pull request button to begin the pull request.
(Alternatively, if you don't see this highlighted area, you can switch to your branch using the Branch button and then click the New pull request button.)
Step 13: Create the pull request
When opening a "pull request", you are making a "request" that the project repository "pull" changes from your fork. You will see that the project repository is listed as the "base repository", and your fork is listed as the "head repository":
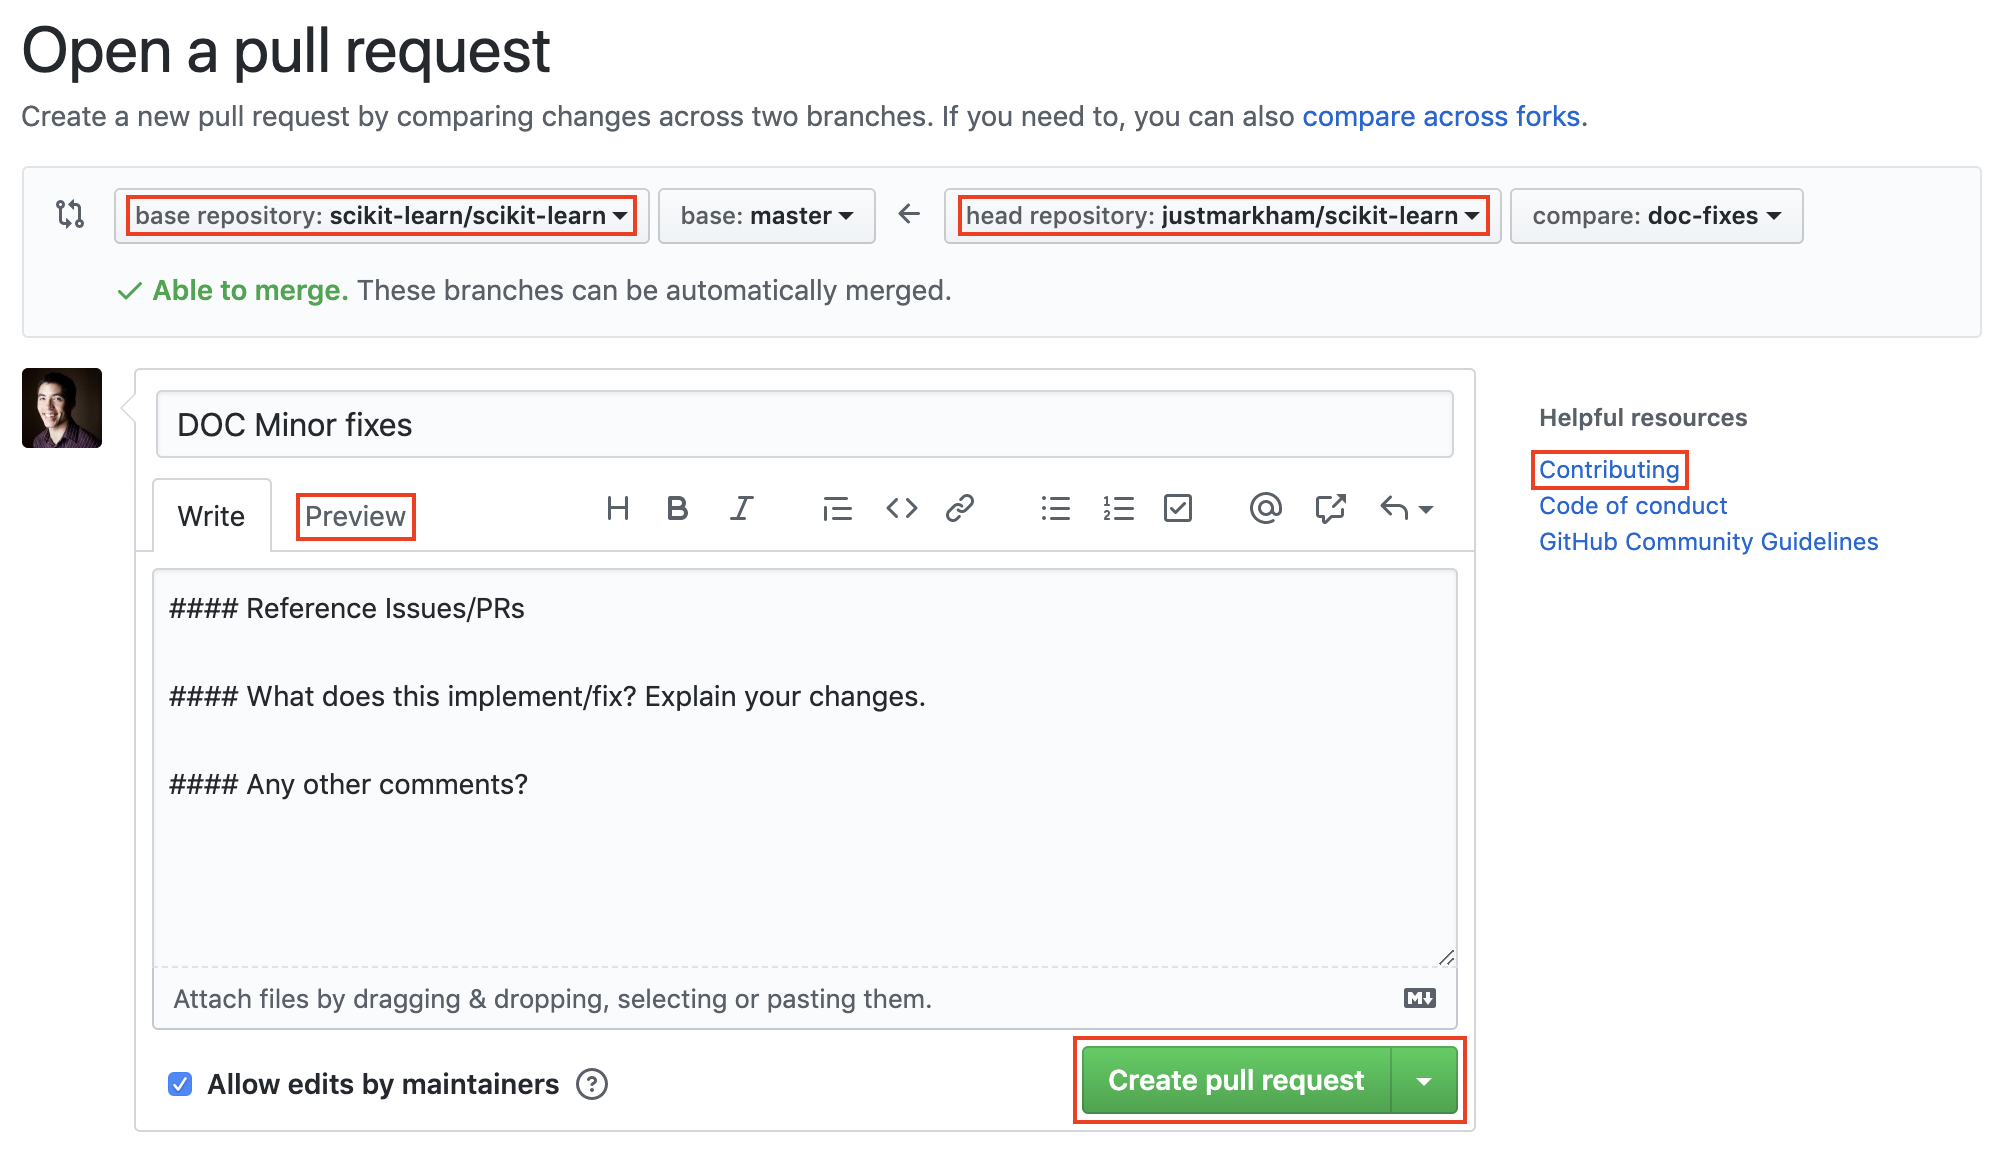
Before submitting the pull request, you first need to describe the changes you made (rather than asking the project maintainers to figure them out on their own). You should write a descriptive title for your pull request, and then include more details in the body of the pull request. If there are any related GitHub issues, make sure to mention those by number. The body can include Markdown formatting, and you can click the Preview tab to see how it will look.
On the right side, you may see a link to the project's Contributing guidelines. This is primarily worth reading through if you are submitting substantial code (rather than just fixing a typo), but it may still be worth scanning through at this point.
Below the pull request form, you will see a list of the commits you made in your branch, as well as the "diffs" for all of the files you changed.
If everything looks good, click the green Create pull request button!
This diagram summarizes the entire pull request process process (steps 7 through 13):
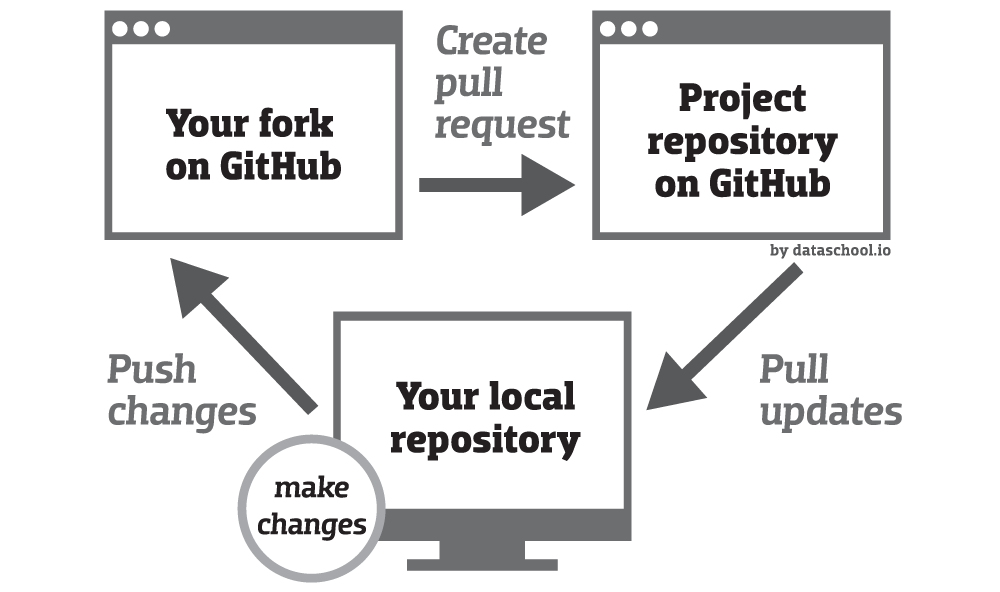
Step 14: Review the pull request
You have now created a pull request, which is stored in the project's repository (not in your fork of the repository). It's a good idea to read through what you wrote, as well as clicking on the Commits tab and the Files changed tab to review the contents of your pull request:
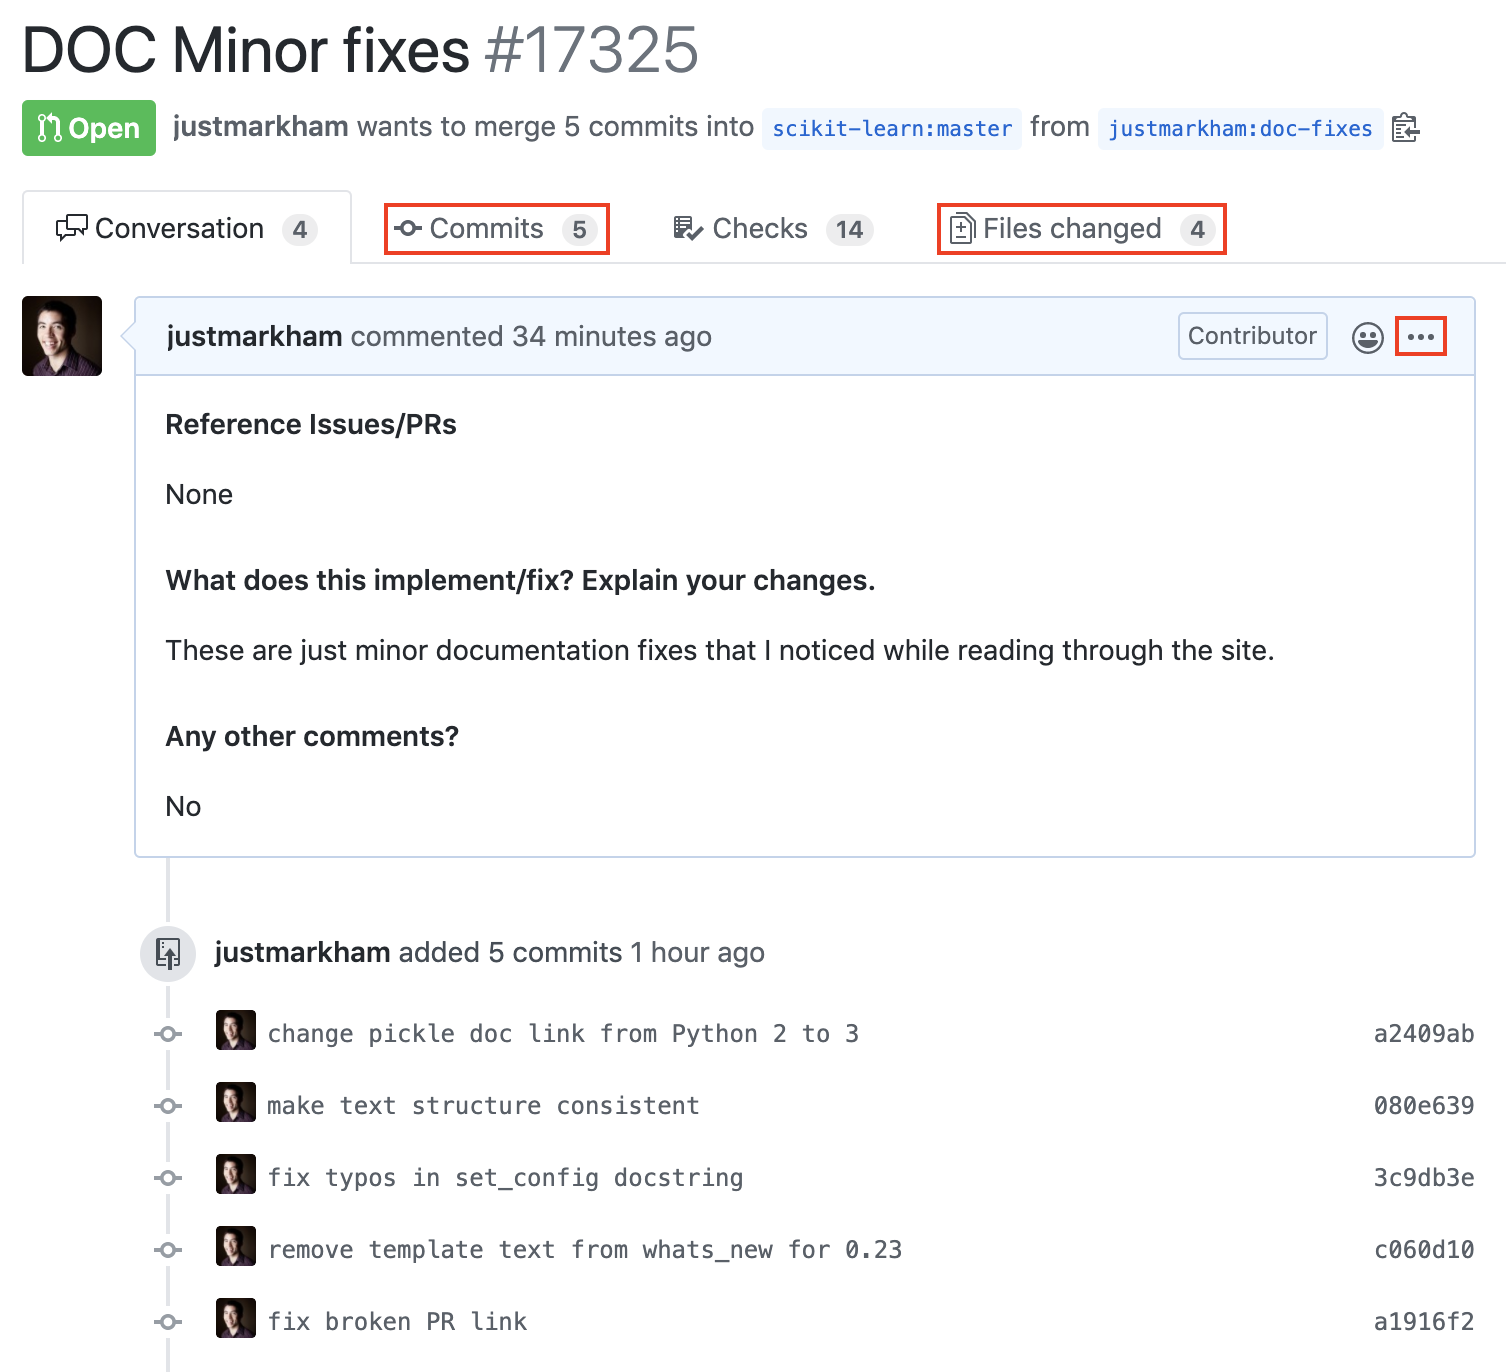
If you realize that you left out some important details, you can click the 3 dots in the upper right corner to edit your pull request description.
Step 15: Add more commits to your pull request
You can continue to add more commits to your pull request even after opening it! For example, the project maintainers may ask you to make some changes, or you may just think of a change that you forgot to include:
Start by returning to your local repository, and use git branch to see which branch is currently checked out. If you are currently in the master branch (rather than the branch you created), then use git checkout BRANCH_NAME to switch. For example, I used git checkout doc-fixes.
Then, you should repeat steps 9 through 11: make changes, commit them, and push them to your fork.
Finally, return to your open pull request on GitHub and refresh the page. You will see that your new commits have automatically been added to the pull request:

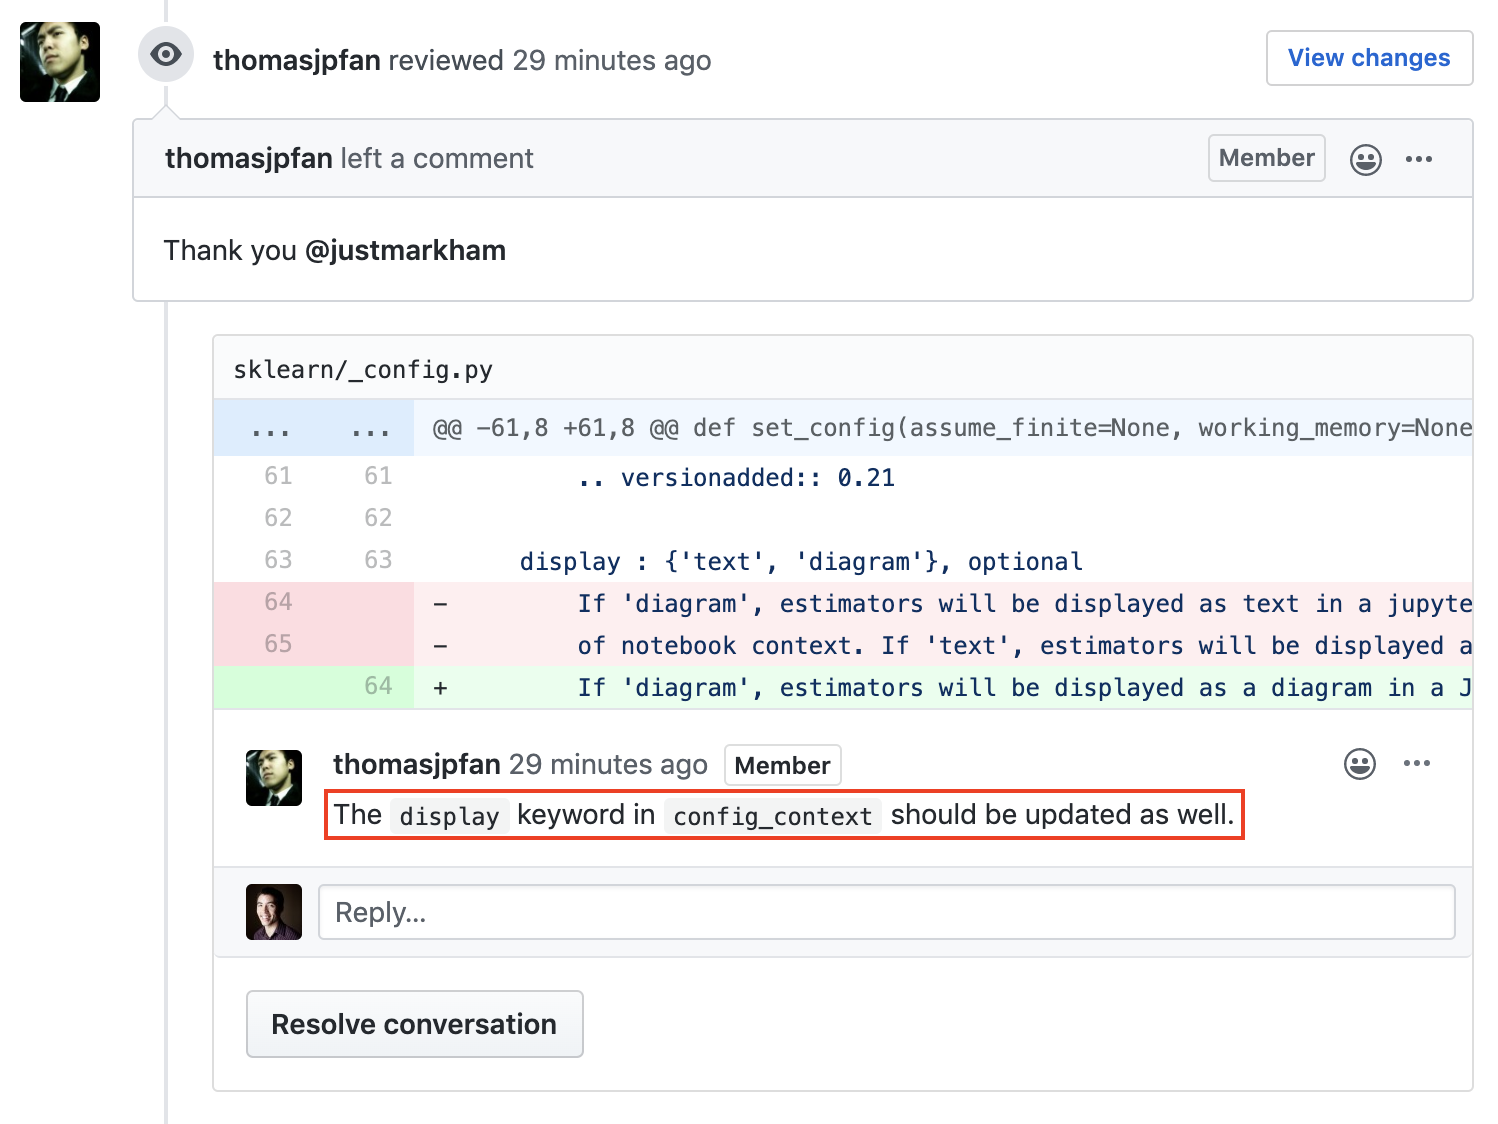
Step 16: Discuss the pull request
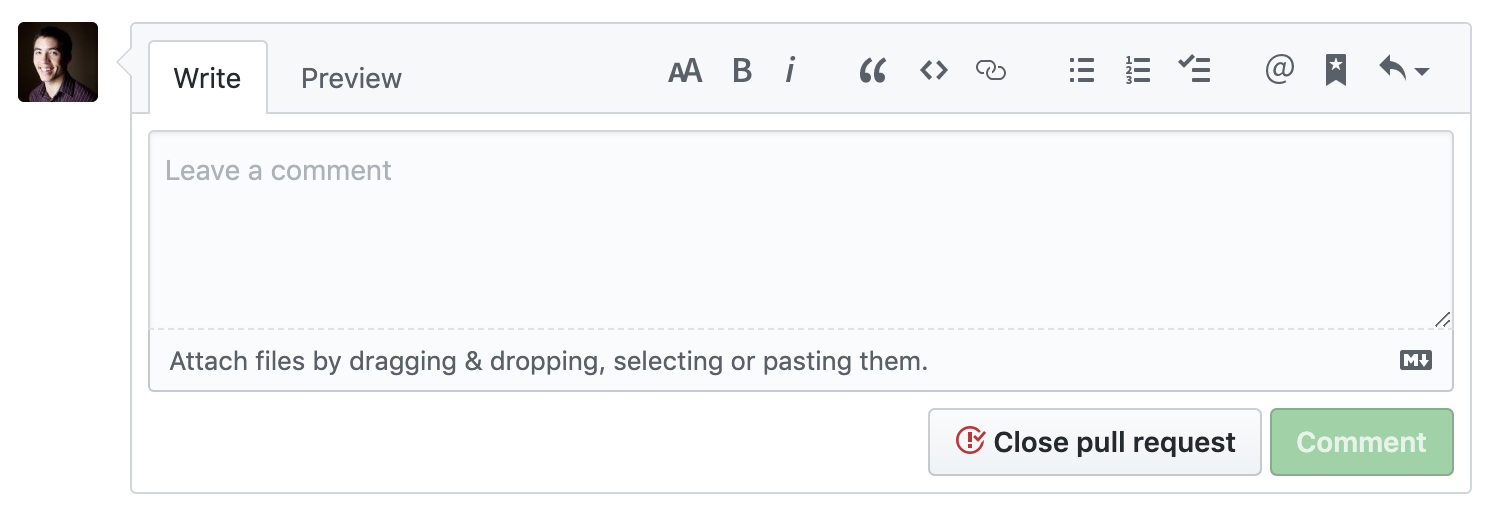
If there are questions or discussion about your pull request from the project maintainers, you can add to the conversation using the comment box at the bottom of the pull request:
If there are inline comments about specific changes you made, you can respond to those as well:
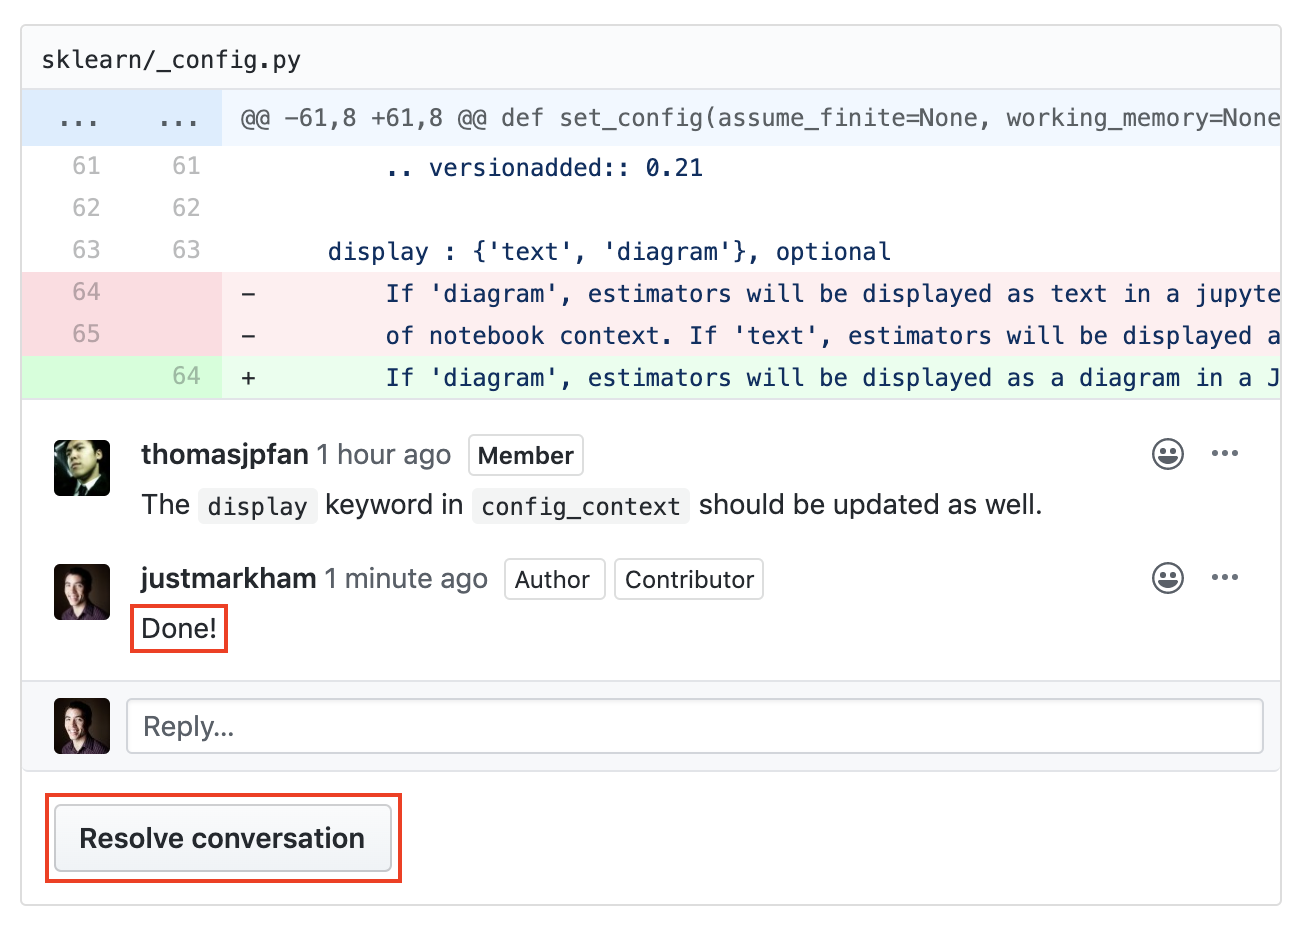
Click the Resolve conversation button once you have addressed any specific requests.
Step 17: Delete your branch from your fork
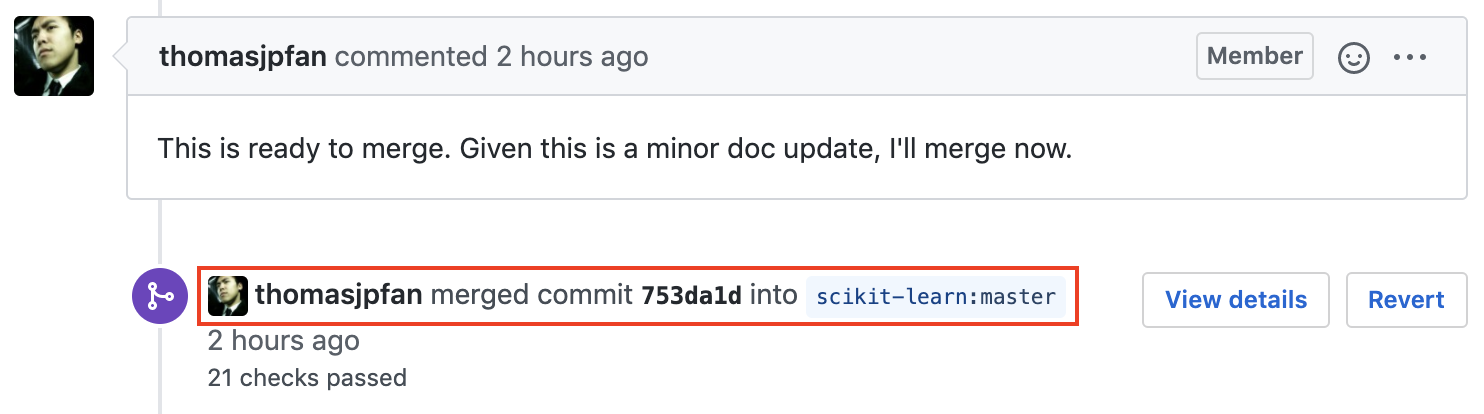
If the project maintainers accept your pull request (congratulations!), they will merge your proposed changes into the project's master branch and close your pull request:
You will be given the option to delete your branch from your fork, since it's no longer of any use:

Click the Delete branch button:

Step 18: Delete your branch from your local repository
You should also delete the branch you created from your local repository, so that you don't accidentally start working in it the next time you want to make a contribution to this project.
First, switch to the master branch: git checkout master.
Then, delete the branch you created: git branch -D BRANCH_NAME. For example, I used git branch -D doc-fixes.
Step 19: Synchronize your fork with the project repository
At this point, your fork is out of sync with the project repository's master branch.
To get it back in sync, you should first use Git to pull the latest changes from "upstream" (the project repository) into your local repository: git pull upstream master.
Then, push those changes from your local repository to the "origin" (your fork): git push origin master.
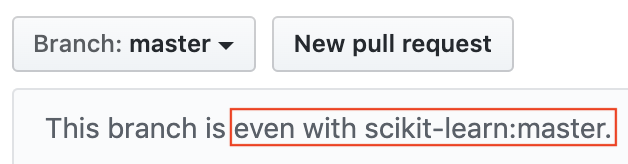
If you return to your fork on GitHub, you will see that the master branch is "even" with the project repository's master branch:
This step is not strictly necessary, since you will pull changes from upstream before you make your next contribution to this project (step 7). However, this step is useful if you are going to clone your fork from another machine.
Congratulations!
Congratulations on making your first open source contribution! 🎉 Please share a link to your successful pull request in the comments section below. If you ran into any unexpected problems, I'd love to hear about it so that I can continue to improve this guide.
Tips for contributing code
If you're ready to start making code contributions (beyond just fixing typos), here are a few tips:
- Browse through a repository's open issues (especially ones labeled "good first issue") to see if there is an issue you might be able to solve.
- If you're planning to contribute code that is unrelated to an existing issue, it's a good idea to open a new issue describing your proposal before starting work on it. The project maintainers might give you feedback that will help to shape your work, which will ultimately increase the likelihood that your pull request will be accepted.
- Read the project's contributing guide, which will usually be in the GitHub repository or the project documentation. It will likely contain many helpful tips for how to successfully contribute to the project.
Good luck, and let me know if you have any questions!